
3D printing enthusiast? Learn how you can give 3D prints a metallic finish!

Not only has 3d printing revolutionised the corporate world, but is also of great interest to the private sector and hobbyists! With the help of 3D printing, impressive replicas can be produced, replacements for wear parts can be printed, small works of art can be created or, in theory, even industrial production can be managed. The creation of 3D prints is essentially straightforward and the financial outlay is manageable due to the material used. If you are no longer satisfied in the long run with the frequently used plastics as the final material, if printing directly into metal is too cost-intensive for you or if you simply prefer a visually appealing finish made of one real metal of your own choice, we recommend our 3D print finishing process at this point! In the course of this page you will find valuable information on the process of electroplating 3D prints as well as an overview of the possibilities of electroplating for 3D printing and electroforming. The areas of application are almost limitless. Play figures, gifts, small parts up to tools or decorative objects, as well as technical devices, jewellery, conductive tracks and circuit boards can be created with 3D printing, treated with copper conductive lacquer and finally be electroformed.
One process – infinite possibilities

Electroforming – forming stable metallic solids
Electroforming' is a process for depositing thick metal layers from an electrolyte, in which metallic solids are formed. Today, the process is used industrially in microsystems technology, but is also popular in a simplified form in the hobby sector. Our acidic bright copper electrolyte is used as plating solution in electroforming to first grow copper layers layer by layer on your object treated with copper or silver conductive lacquer.
Process for electroplating 3D prints – here’s how it works
- Deburr, sand and clean the 3D-printed object.
- Apply Tifoo copper conductive lacquer and allow drying to establish conductivity.
- Electroplate the object in acidic brightcopper solution for maximum conductivity.
- Recommended: Coat with palladium to create a metallic barrier layer.
- Coating the surface with desired metal (e.g. silver, gold) and process (brush, pen or bath).
- Optional: Sand or polish the surface for maximum mirror finish.


Valuable tips for optimal results
- A clean, smooth and grease-free surface is of crucial importance for the results further on in the process.
- The copper conductive lacquer should be applied evenly and, if necessary, dried thoroughly between several coats.
- Ideally, you should already print your 3D object so that it has a predefined location for later contacting in the electroplating bath.
- Avoid voids in the object to prevent floating in the bath or liquid absorption.
- After copper plating, make sure that the object does not mist up. Thorough cleaning between all work steps further improves the results.
Frequently asked questions
Wir haben dafür ein FAQ erstellt, um häufige Fragen schnell zu beantworten: Die Stabilität der Sperre ist von verschiedenen Faktoren abhängig, wie dem pH-Wert des Mauerwerks oder der Lichteinwirkung. Da diese Faktoren im Mauerwerk für die Funktionsweise von TOBOLIN günstig sind, kann davon ausgegangen werden, dass eine mit TOBOLIN eingebrachte Kapillarwassersperre bei korrekter Anwendung mehrere Jahrzehnte wirkt. Sollte die Sperre mit der Zeit schwächer werden, kann TOBOLIN an den entsprechenden Stellen einfach erneut eingebracht werden. https://www.tobolin.de/haeufig-gestellte.../wirkung-dauer
Our products cover the majority of the most common aluminium alloys. However, the industry is constantly evolving. For an overview table of compositions suitable for anodising, please see our anodising guide.
Aluminium and titanium are suitable for anodising. We recommend our products exclusively for aluminium.
In this case, the concentration of the colour solution is not high enough. We recommend 10g/L. Also possible: the alloy is not or only insufficiently suitable for anodising. You can find an overview table on this in our instructions for anodising.
When anodising, the surface area of the workpiece is calculated in dm² and multiplied by 1.5. This gives the necessary amperage for your project. As soon as you set this on your machine, the voltage regulates itself automatically.
No. Only the aluminium piece and titanium wire may be immersed in the solution with the anodising bath. The alligator clips must not come into contact with the bath.
Our product range currently allows us to burnish the following materials: Iron, steel, zinc, aluminium and various non-ferrous metals. Check the product detail page for compatibility with the material you have.
Our bluing agents primarily create a black coloured surface that is not a real coating but inhibits the existing surface of steel, stainless steel or aluminium. Corrosion protection is only achieved if the blackened layer is oiled or painted at the end.
This is most likely because the remnants of the bluing agent have not been rinsed off cleanly enough. This causes components of the bluing to crystallise on the surface and form a reddish-brown layer that looks like rust. Make sure that residues of the bluing liquid are completely removed at the beginning and end and that the surface is clean. Repeat the blackening process and wash off the bluing chemical carefully and completely at the end!
Tobostick-Verfahren wurde im Gegensatz zum Schrägbohrverfahren speziell dafür entwickelt, Hohlräume im Mauerwerk zu überbrücken. Darüber hinaus ermöglicht es die Erstellung einer waagrechten Horizontalsperre, was gerade bei hohen Mauerstärken Vorteile bietet. Die Injektionsflüssigkeit wird durch den Kapillareffekt vom Mauerwerk aufgenommen - die Flaschen werden durch diesen Effekt leer, obwohl sie sich unter dem Bohrloch befinden. Natürlich bieten wir aber auch das dir bekannte Schrägbohrverfahren an.
https://www.tobolin.de/anleitung-fuer-das-schraegbohrverfahren
https://www.tobolin.de/anleitung-fuer-das-tobostick-verfahren
This varies from electrolyte to electrolyte. If the anodes are made of the same material as the salt in the electrolyte solution (e.g. copper, nickel, silver, zinc), the salt content remains constant because the anode dissolves slowly but steadily. However, the electrolyte is still contaminated at some point and brighteners (if present) are used up.
Certain electrolytes can be diluted. The gold electrolytes Flash and Midas can be diluted in a ratio of up to 1:1. However, the speed of deposition and the shine then decrease rapidly.
No, unfortunately that is not possible. Our chrome electrolyte only works in conjunction with the brush process (tampon electroplating).
The anodes should be at least as large as the surface of the object to be coated. The supply of 2 anodes (left and right) has been proven to give better results.
You have to multiply the current density recommended for the respective electrolyte by the surface area of the workpiece in dm² and then get the required current intensity. The voltage will readjust when the current is set accordingly.
If you want to coat from both sides at the same time, you should place an anode in the tank on each side and place the workpiece in the middle. The deposition is then more uniform than with the method with only one anode.
The depletion of the electrolyte can be recognised by the slowing deposition. The colouring of the gold electrolyte Midas, for example, does not indicate that the electrolyte has been used up.
For gold and palladium: stainless steel or graphite. For copper (basic and acidic): Copper. For nickel electrolyte: nickel. For silver electrolyte: silver. For zinc electrolyte: zinc. For chrome electrolyte: not compatible with bath electroplating.
Bei Diamanten/Edelsteinen ist Karat ist ein Gewichtsmaß. Ein Karat entspricht hier genau 0,2 Gramm.
Im Edelmetallhandel wird der Goldanteil bei Barren und Münzen hingegen als Feingehalt oder Feingoldgehalt, meist in Form einer Prägung, angegeben. Reine Goldbarren besitzen die Prägung 999,9, auch bekannt als „four nine fine“.
Im Folgenden finden Sie eine Übersicht über die Karat-Angaben bei Gold:
8 Karat:
333er
Gold 33,3 %
9 Karat:
375er
Gold 37,5 %
10 Karat:
417er
Gold 41,7 %
14 Karat:
585er
Gold 58,5 %
18 Karat:
750er
Gold 75 %
20 Karat:
833er
Gold 83,3 %
21 Karat:
875er
Gold 87,5 %
22 Karat:
916,66er
Gold 91,666 %
24 Karat:
999er
Gold 99,9 %
Edelmetalle bieten Anlegern immer eine Art Sicherheit während Finanzkrisen. Gängigere Metalle wie Gold und Silber können so auch als Tauschmittel verwendet werden, jedoch sind unbekanntere Edelmetalle genau aus diesem Grund mit einem Risiko verbunden. Die jeweiligen Preise sind meist sehr abhängig vom Markt und können je nach Geschehen sehr schwanken. Sichere Wertanlagen sind hierbei Gold, Silber, Platin und Palladium.
Gold
Gold hat das chemische Symbol Au (Aurum). Gold wird, obwohl es auch z.B. in der Medizin Verwendung findet, weniger als Rohstoff, sondern mehr als reines Anlagemetall gehandelt.
Daten zu Gold 999:
Farbe: gelb, gold
Dichte: 19,3 g/cm3
Leitfähigkeit: 45 MS/m
Silber
Silber hat das chemische Symbol Ag (Argentum). Das Edelmetall wird aus Silber-, Kupfer- und Bleierzen gewonnen. Anders als Gold wird Silber an der Börse als Rohstoff gehandelt, welcher auch in der Industrie benötigt wird. Von Kleinanlegern kann Silber in Form von bis zu fünf Kilo-Barren und Münzen gekauft werden.
Daten zu Silber 999:
Farbe: glänzend gräulich, silber
Dichte: 10,5 g/cm3
Leitfähigkeit: 61 MS/m
Platin
Platin hat das chemische Symbol Pt. Es ist eines der wertvollsten Edelmetalle überhaupt, da es in viel geringeren Mengen vorkommt als beispielsweise Gold. Durch seine Korrosionsbeständigkeit findet es in der Medizin sowie in der Industrie Gebrauch. Platin wird in Form von Barren und Münzen gehandelt.
Daten zu Platin 999,5:
Farbe: gräulich, silber
Dichte: 21,45 g/cm3
Leitfähigkeit: 9,1 MS/m
Palladium
Palladium hat das chemische Symbol Pd. Es gehört zu den Platinmetallen. Durch sein seltenes Vorkommen ist es sehr wertvoll. Palladium tritt in Verbindung mit Kupfer-, Nickel-, Gold- und Silbererzen auf. Vor allem in der Zahntechnik findet es Verwendung. Zudem wird es in physischer Form von Barren oder Münzen gehandelt und kann von Kleinanlegern als Wertanlage erworben werden.
Daten zu Palladium 999,5:
Farbe: gräulich, silber
Dichte: 11,99 g/cm3
Leitfähigkeit: 9,2 MS/m
Kupfer
Kupfer hat das chemische Symbol Cu. Es zählt zur Gruppe der Münzmetalle. Zudem ist es sehr leitfähig und leicht zu verarbeiten. Zu finden ist es vor allem in der Automobil- und Maschinenbaubranche, inzwischen aber auch bei erneuerbaren Energien. Für Anleger kann es in Barren- sowie auch in Münzenform gekauft werden.
Daten zu Kupfer 999:
Farbe: rotbraun, metallisch, kupferfarben
Dichte: 8,92 g/cm3
Leitfähigkeit: 58,1 MS/m
Rhodium
Rhodium hat das chemische Symbol Rh und zählt zu den Platinmetallen. In der Natur kommt es sehr selten vor, weswegen es äußert teuer ist. Demzufolge ist eine Verwendung nicht häufig, jedoch findet man Rhodium vor allem in Fahrzeugkatalysatoren. Anlage-Rhodium ist auch in Form von Barren erhältlich.
Daten zu Rhodium 999:
Farbe: silbrig weiß, metallisch
Dichte: 12,38 g/cm3
Leitfähigkeit: 18,5 MS/m
Iridium
Iridium hat das chemische Symbol Ir und ist nach Osmium das zweitdichteste Element. Es ist eines der seltensten, nicht-radioaktiven Metalle überhaupt. Iridium wird vor allem im Maschinenbau und in der Medizin verwendet. Das in Paris verwahrte Urkilo und der dort ebenfalls befindliche Urmeter bestehen ebenfalls aus einer Iridium-Legierung. Das Edelmetall ist sehr wertvoll und wird an der Börse gehandelt. Für Kleinanleger gibt es ebenfalls Iridium-Barren und Münzen.
Daten zu Iridium 999,5:
Farbe: gräulich, mattsilber
Dichte: 22,56 g/cm3
Leitfähigkeit: ca. 19,7 MS/m
Ruthenium
Ruthenium hat das chemische Symbol Ru und gehört zu den Platinmetallen. Es ist sehr selten und wird nur in geringen Mengen genutzt. Hauptanwendungsgebiete des Metalls liegen in der Elektronikindustrie. Einige Komplexe des Metalls werden hinsichtlich ihrer Wirkung als Mittel gegen Krebs erforscht. Für Anleger kann Ruthenium in Barrenform erworben werden.
Daten zu Ruthenium 999:
Farbe: silbrig weiß metallisch
Dichte: 12,37 g/cm3
Leitfähigkeit: 14,1 MS/m
Mitgliedschaften und Zertifizierungen:
Offizielle
Goldhändler besitzen meist Mitgliedschaften wie beispielsweise beim
„Berufsverband des Deutschen Münzenfachhandels e.V.“ oder eine
„Good-Delivery“-Zertifizierung der „London Bullion Market Association“.
Mitglieder und Zertifizierungen dieser Art sind auf den jeweiligen
Seiten öffentlich einzusehen.
„Spot-Preis“:
Händler sind an den derzeitigen Gold-Preis, dem „Spot-Preis“, gebunden
und verkaufen nicht unter Wert. Falls Sie ein besonders günstiges
Angebot im Internet finden, sollten Sie lieber aufpassen.
Service-Tests:
Glaubwürdige Goldhändler sind auch bei Service-Tests zu finden.
Testreihen von „Focus Money“ oder „Euro am Sonntag“ überprüfen
regelmäßig verschiedene Anbieter, woran Sie sich orientieren können.
Homepage und Kommunikation:
Schon auf der Homepage können Sie Betrüger entlarven. Vergleichen Sie die Preise der Angebote mit dem aktuellen Gold-Chart.
Persönlicher Kontakt zum Händler:
Seriöse Händler bieten Ihnen immer auch einen persönlichen Kontakt an und sind jederzeit für Sie auch telefonisch zu erreichen.
Produktbeschreibung:
Auch
hier können Sie schlechte Fälschungen sofort erkennen. Seriöse
Goldhändler bieten Ihnen meist Bilder der Produkte mit hoher Auflösung
an, Fälscher meist minderwertigere, um offensichtliche äußerliche
Unterschiede zu verschleiern. „Vergoldet“ bedeutet nicht massiv Gold,
„Feingoldauflage“ ist nichts anderes als Fremdmetalle, die mit einer
dünnen Schicht von wertvollem Feingold überzogen sind. Auch Ausdrücke
wie „Replik”, „Medaille”, „Nachbildung” oder gar „Counterfeit” sollten
Sie als Warnhinweise interpretieren.
Die Magnetwaage kann für eine Vielzahl von Objekten eingesetzt werden. So können z.B. Barren bis zu 250 g untersucht werden, ebenso gängige Münzgrößen bis 5 Oz. Für Barren von größerem Gewicht empfiehlt sich eine zusätzliche Prüfung mit unserem Barrenprüfset, da Fremdmetalleinschlüsse hinter Goldschichten von mehr als 2,5 mm Dicke mit der Magnetwaage eventuell nicht detektiert werden können. Allerdings sind solch dicken Überzüge zumindest vorläufig noch die Ausnahme (eine Tatsache die sich aber durch Entwicklungen wie die Magnetwaage eventuell ändern kann).
Vorsicht: Das Magnetfeld der Waage könnte sensible Geräte wie Uhren beschädigen. Prüfen Sie dies vorab und legen Sie Objekte dieser Art keinesfalls leichtfertig auf die Magnetwaage.
Eine Fälschung kann auf der Magnetwaage unter Umständen dann ein positives, also diamagnetisches, Ergebnis liefern, wenn der Fremdkern zu tief im Inneren verborgen ist und somit durch die diamagnetische Schicht der paramagnetische "Falschkern" nicht erkannt wird. Die maximale Dicke einer Goldschicht durch die gemessen werden kann beträgt circa 2,5 mm.
Ebenso kann eine Ummantelung aus einem stark diamagnetischen Material, welches einen stark positiven Wert hervorruft (z.B Bismut), den weiter innen liegenden paramagnetischen Kern (der ja einen negativen Wert liefert) sozusagen ausgleichen und dann den Wert in Richtung "+" verfälschen. Allerdings wären derartige Fälschungen schwer herzustellen, eine relative dicke z.B. Bismutschicht benötigen und würden damit durch den Gewichts- bzw. Dichtetest auffallen.
Das hängt ganz davon ab, welche Objekte man überprüfen möchte:
Für klassische Anleger (Münzen und Barren) ist die GoldScreenSensor in Kombination mit Messschieber und Feinwaage meist ausreichend (misst auch durch Verpackungen). Für Barren ab 50 bis 100 Gramm aufwärts empfehlen wir ergänzend den BarScreenSensor, für den die Objekte jedoch ausgepackt werden müssen. Der GoldScreenPen kann außerdem auch für kleinere Anlageobjekte bis ca. 1 Unze eingesetzt werden.
Bei Goldschmuck ist die Messung mit einer Kombination aus CaratScreenPen sowie DensityScreenScale ideal. Mit unseren Prüfsäuresets kann der Feingehalt von Gold (Karatzahl) ebenfalls bestimmt werden.
Als Wolframdetektor ist die MagneticScreenScale für Goldobjekte von circa 1/4 Unze bis 250 g eine Alternative zum GoldScreenSensor. Wer ganz auf Gold setzt und z.B. 100-Gramm-Barren nicht auspacken möchte, ist mit dieser Magnetwaage gut beraten.
Goldanalytix produziert und entwickelt seine eigenen Produkte mit höchsten Qualitätsansprüchen in Regensburg, Deutschland, im Firmengebäude der Dachfirma MARAWE GmbH & Co. KG.
Anonymer Kauf nur unter 2000 Euro möglich:
Wenn
der Kauf von Gold, Silber oder anderen Edelmetallen anonym bleiben
soll, darf der Preis des gekauften Edelmetalls einen Preis von 1.999,99
Euro nicht überschreiten. Bei jeder Summe, welche über diesem Betrag
liegt, ist der Händler laut Geldwäschegesetz verpflichtet, die
Personalien aufzunehmen.
Bei großen Goldbarren ist der Händler-Aufschlag geringer:
Wenn
ein fester Betrag in physische Edelmetalle investiert werden soll,
empfiehlt es sich möglichst große Barren zu kaufen, da bei kleinen
Barren der Aufschlag des Händlers vergleichsweise groß ist. Ein
1-Unzen-Barren kostet ca. 1.576,30 Euro (Stand Oktober 2021). 1 Unze
Gold in Form von 1-Gramm-Barren kostet hingegen 1.737,82 Euro. Der
Gramm Preis übersteigt den Preis einer Unze um rund 9,29%. Für Münzen
sind die Aufschläge wegen der Prägung ebenfalls höher als für Barren.
Goldmünzen oder 995er Goldbarren kaufen, statt Mehrwertsteuer zahlen:
Wenn
Gold in Barren Form erworben werden soll, ist es sinnvoll reine
Goldbarren (99,5% Goldanteil) zu kaufen, da erst bei einer solchen
Reinheit keine Mehrwertsteuer anfällt. Goldmünzen sind schon ab einer Reinheit von 90% von der Mehrwertsteuer befreit, jedoch nur wenn sie nach 1800 geprägt wurden und in ihrem Herkunftsland als offizielles Zahlungsmittel gelten oder gegolten haben.
Zusätzlich darf der Preis den Materialwert des Goldgehalts um höchstens
80% überschreiten (manche Sammlermünzen haben einen noch höheren
Marktwert). Bei dem Kauf von Silber oder anderen Edelmetallen bei
gewerblichen Händlern fällt in Deutschland immer die übliche
Mehrwertsteuer von 19% an.
Schmuck und Sammlermünzen sind vor allem für Kenner geeignet:
Bei
Schmuck und Sammlermünzen aus Edelmetallen (z.B. antike oder seltene
Münzen), ist zu beachten, dass sich der Wert des Stücks nicht nur aus
dem reinen Metallpreis zusammensetzt, sondern auch noch andere Faktoren
den Wert beeinflussen können. Bei Schmuck, kann Beispielsweise die
Verarbeitungsqualität, der Hersteller oder ein zusätzlicher Edelstein
den Preis in die Höhe treiben. Bei Münzen, kann eine solche
Preissteigerung durch das Alter, das Herkunftsland oder das abgebildete
Motiv hervorgerufen werden. Zur Wertbestimmung ist eine gewisse
Expertise notwendig und mögliche Wertsteigerungen neuer Münzen sind in
der Regel mit spekulativen Risiken verbunden.
Kleine Objekte sind in der Regel leichter zu verkaufen:
Auch
wenn der Aufpreis für kleinere Objekte höher ist, lassen Sie sich oft
leichter verkaufen. Man kann sowohl einen Teil der Investitionssumme
wieder in Bargeld verwandeln (große Barren zerschneiden schmälert den
Verkaufswert) als auch in gesellschaftlichen Krisen die kleinen Stücke
besser als Tauschobjekt einsetzen.
Vom Händler kaufen oder bei Privatverkäufern selbst auf Echtheit prüfen:
Es ist empfehlenswert Gold und andere Edelmetalle bei seriösen Händlern
zu erwerben. Andernfalls, wenn man z.B. durch Privatkauf die
Mehrwertsteuer einsparen möchte (Beträgt bei Edelmetallen außer Gold
immerhin 19%), sollte geprüft werden, ob das Edelmetall echt ist. Die dazu nötigen Tests können entweder selbst angewandt werden (z.B. mit dem GoldScreenSensor) oder bei einem Edelmetallhändler durchführt werden lassen.
Gold vor Ort erwerben, statt eine Fälschung im Internet zu kaufen:
Es
ist davon abzuraten, Edelmetalle über private Online-Handelsplattformen
wie Ebay oder Amazon zu kaufen, da dort Betrüger ein leichtes Spiel
haben. Häufig kommt es vor, dass Kunden vermuten, ein gutes Geschäft
gemacht zu haben und dann nur eine Fälschung aus Kupfer mit einer dünnen
Goldschicht erhalten. Falls es auf diesen Plattformen jedoch einmal ein
echtes Angebot geben sollte, ist dieses in der Regel überteuert, da
Plattformen wie Ebay oder Amazon immer Gebühren von Verkäufern
einfordern. Ein persönliches Verkaufstreffen ist dem Paketversand beim
Privatkauf vorzuziehen, um die Echtheit zu prüfen zu können.
Eine Punzierung ist nicht essenziell aber doch nicht unwichtig:
Bei
neueren Münzen, Schmuck oder Barren ist eine Punzierung standardmäßig
vorhanden. Sie gibt neben dem Feingehalt teilweise weitere Informationen
über das Edelmetall an, z.B. von welchem Hersteller es stammt, um
welches Material es sich handelt oder wann das Stück gefertigt wurde.
Ja und nein. Theoretisch lässt sich mit einem Magneten erkennen, ob bei ein Objekt ein Dia- oder Paramagnetismus vorliegt. Allerdings sind die magnetischen Kräfte bei herkömmlichen Magneten oftmals so gering, dass sie nicht mit dem menschlichen Auge erkannt werden können. Für eine Messung benötige man somit einen sehr starken Magneten. Daher empfiehlt sich eine Magnetwaage, die bis in den hundertstel Grammbereich messen kann. So lassen sich so auch sehr feine Unterschiede erkennen und eindeutige Ergebnisse erzielen.
Am besten wiederholen Sie die Messung. Vor einer zweiten Messung beachten Sie bitte folgende Schritte:
1. Prüfen Sie, ob alle Komponenten des Dichtemessaufbaus fest auf der Waage aufsitzen und richtig angeordnet sind.
2. Sollte ein gänzlich unerwartetes Ergebnis erscheinen, so starten Sie das Gerät neu und warten Sie einige Minuten.
3. Trockne Sie alle Komponenten, die nicht mit dem Wasserbad in Berührung sein sollten, sorgfältig ab.
Nun sollte die Waage Ihnen ein aussagekräftiges Ergebnis liefern.
Zusätzlich es sein, dass im Material von aussen nicht sichtbare Hohlräume vorliegen oder das Objekt im Inneren poröser ist, als es von außen den Anschein macht. Auch nicht erwartete Verunreinigungen mit dichteren oder weniger dichten Materialien/Stoffen kann für eine Falsch-Antwort verantwortlich sein.
Bei weiteren Fragen, kontaktieren Sie uns gerne.
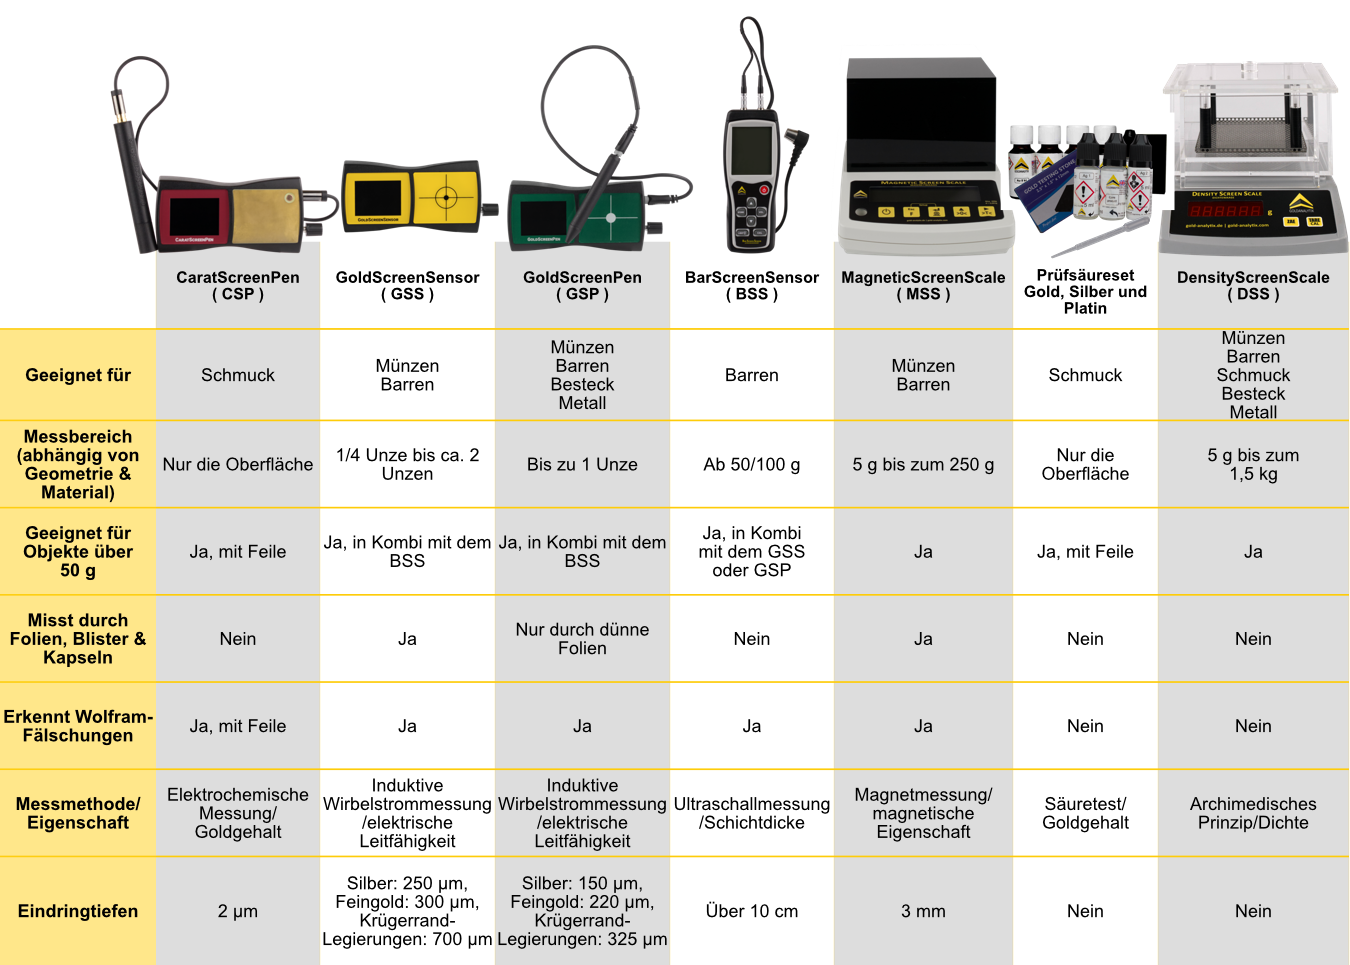
Das hängt ganz davon ab, welche Objekte man überprüfen möchte:
Für klassische Anleger (Münzen und Barren) ist die GoldScreenSensor in Kombination mit Messschieber und Feinwaage meist ausreichend (misst auch durch Verpackungen). Für Barren ab 50 bis 100 Gramm aufwärts empfehlen wir ergänzend den BarScreenSensor, für den die Objekte jedoch ausgepackt werden müssen. Der GoldScreenPen kann außerdem auch für kleinere Anlageobjekte bis ca. 1 Unze eingesetzt werden.
Bei Goldschmuck ist die Messung mit einer Kombination aus CaratScreenPen sowie DensityScreenScale ideal. Mit unseren Prüfsäuresets kann der Feingehalt von Gold (Karatzahl) ebenfalls bestimmt werden.
Als Wolframdetektor ist die MagneticScreenScale für Goldobjekte von circa 1/4 Unze bis 250 g eine Alternative zum GoldScreenSensor. Wer ganz auf Gold setzt und z.B. 100-Gramm-Barren nicht auspacken möchte, ist mit dieser Magnetwaage gut beraten.
Bei der Messung mit dem BarScreenSensor ist es wichtig die Verpackung des Objektes zu entfernen und das Ultraschallgel auf dem Messkopf aufzutragen, um damit den gesamten Barren abrastern. Denn es kann sein das sich Fremdmetalleinschlüsse nur an bestimmten Stellen innerhalb des Objektes finden lassen. Zudem sollte man den Barren vorher physisch abmessen, damit man den gemessenen Ultraschallwert mit der realen Dicke vergleichen kann.
- Achten Sie auf einen möglichst ruhigen und erschütterungsfesten Standort der Waage.
- Die DensityScreenScale hat sich in den meisten normalen und betrieblichen Umgebungen bewährt, wobei eine Raumtemperatur von 20-25 °C ideal ist. Entscheidend ist vor allem, dass die Temperatur während der Betriebs- bzw. Benutzungszeit konstant bleibt.
- Benutzen Sie für das Wasserbad idealerweise Wasser mit einer Temperatur von ca. 20-25 °C. Füllen Sie weder sehr kaltes noch sehr warmes Wasser ein, da dies die Genauigkeit der Dichtemessung beeinflusst.
- Das Prüfstück muss trocken und sauber sein und sollte keine in Wasser lösliche Schicht besitzen. Auch Fett- und Ölschichten müssen vor der Bestimmung entfernt werden.
- Bei schwach benetzenden Flüssigkeiten (z.B. normalem Wasser) kann es vorkommen, dass sich Luftblasen am Träger bzw. am Messobjekt anlagern. Eine Luftblase mit einem Durchmesser von 2 mm verursacht hierbei schon eine Messungenauigkeit von 4 mg.
Grundsätzlich lässt sich die Dichte berechnen, indem man die Masse eines Objektes durch sein Volumen teilt. Wenn Sie die DensityScreenScale oder das Barrenprüfset GAX1000 besitzen, dann können sie unser Berechnungstool nutzen. Dafür messen Sie das Gewicht an der Luft und das Gewicht im Wasser mit der DensityScreenScale. Diese beiden Werte können sie in das Tool eintragen und dieses gibt Ihnen dann die Dichte aus. Zusätzlich haben Sie mit dem Berechnungstool Vergleichswerte von einigen Legierungen und vielen Reinmetallen. Wenn man die Dichte selbst berechnen möchte lautet die Formel:
Dichte [g/cm³] = Gewicht an der Luft [g] / (Gewicht an der Luft [g] - Gewicht im Wasser [g])
Die DensityScreenScale gibt das Gewicht des Prüflings im Wasser an. Dieses Gewicht können Sie mit dem Gewicht an der Luft in das auf dem USB-Stick mitgelieferte Excel-Berechnungstool eingeben und dann bekommen Sie automatisch die Dichte Ihres Objektes ausgerechnet.
Das hängt ganz davon ab, welche Objekte man überprüfen möchte:
Für klassische Anleger (Münzen und Barren) ist die GoldScreenSensor in Kombination mit Messschieber und Feinwaage meist ausreichend (misst auch durch Verpackungen). Für Barren ab 50 bis 100 Gramm aufwärts empfehlen wir ergänzend den BarScreenSensor, für den die Objekte jedoch ausgepackt werden müssen. Der GoldScreenPen kann außerdem auch für kleinere Anlageobjekte bis ca. 1 Unze eingesetzt werden.
Bei Goldschmuck ist die Messung mit einer Kombination aus CaratScreenPen sowie DensityScreenScale ideal. Mit unseren Prüfsäuresets kann der Feingehalt von Gold (Karatzahl) ebenfalls bestimmt werden.
Als Wolframdetektor ist die MagneticScreenScale für Goldobjekte von circa 1/4 Unze bis 250 g eine Alternative zum GoldScreenSensor. Wer ganz auf Gold setzt und z.B. 100-Gramm-Barren nicht auspacken möchte, ist mit dieser Magnetwaage gut beraten.
Bei der Messung mit dem BarScreenSensor ist es wichtig die Verpackung des Objektes zu entfernen und das Ultraschallgel auf dem Messkopf aufzutragen, um damit den gesamten Barren abrastern. Denn es kann sein das sich Fremdmetalleinschlüsse nur an bestimmten Stellen innerhalb des Objektes finden lassen. Zudem sollte man den Barren vorher physisch abmessen, damit man den gemessenen Ultraschallwert mit der realen Dicke vergleichen kann.
Nein, wir empfehlen den BarScreenSensor erst ab einem Gewicht von 100 Gramm und fast alle Münzen sind kleiner als dieses Gewicht. Wenn die Prüflinge zu klein sind, ist die Weglänge des Ultraschalls nicht lange genug, um eine hinreichend präzise Messung durchzuführen. Zum BarScreenSensor ist der GoldScreenSensor eine hervorragende Ergänzung, die auch kleinere Objekte prüfen kann.
Nein. Für die Ultraschallmessung muss der Messkopf verbunden durch ein Ultraschallgel (im Lieferumfang enthalten) direkt in Kontakt mit der Oberfläche des Objekts sein.
Der GoldScreenSensor kann für kleinere Barren herangezogen werden (geeignet für geprägte 100-Gramm-Barren oder dünnere Objekte).
In principle, it is possible to gold-plate some aluminium alloys with the Gold Star, but so far this only works with a few compositions. The success of the application can therefore not be guaranteed for all aluminium alloys.
Our products for electroless silver plating only deposit on copper and brass as a base, as the products can only deposit silver with these materials. Accordingly, the products for electroless silver plating can NOT be deposited on silver. If copper or brass are coated, a thin silver layer of 200 - 300 nm is produced, which is intended for decorative purposes only. If you want a thicker silver layer on your object, the only process left is electroplating!
Yes, this is possible with the help of our conductive copper varnish. The object is sprayed or brushed with copper conductive paint or copper conductive lacquer spray, which first creates a metallic layer. The object is then given its final conductivity in a galvanic bath with acidic bright copper electrolyte. This creates a continuous, conductive copper layer that can then be further treated like any other copper layer, e.g. by silver plating.
Rust Piranha can normally be painted over or treated further. However, please check on an inconspicuous spot whether the rust converter is compatible with your paint colour.
No, unfortunately that is not possible with these products.
The zinc object must be clean and free of residues such as dirt, oil or particles. The object is then degreased, e.g. with the TIFOO Galvano Degreaser. Depending on the size, the object is immersed in the yellow chromate for a few minutes. 3 minutes is a good guideline.
Das hängt ganz davon ab, welche Objekte man überprüfen möchte:
Für klassische Anleger (Münzen und Barren) ist die GoldScreenSensor in Kombination mit Messschieber und Feinwaage meist ausreichend (misst auch durch Verpackungen). Für Barren ab 50 bis 100 Gramm aufwärts empfehlen wir ergänzend den BarScreenSensor, für den die Objekte jedoch ausgepackt werden müssen. Der GoldScreenPen kann außerdem auch für kleinere Anlageobjekte bis ca. 1 Unze eingesetzt werden.
Bei Goldschmuck ist die Messung mit einer Kombination aus CaratScreenPen sowie DensityScreenScale ideal. Mit unseren Prüfsäuresets kann der Feingehalt von Gold (Karatzahl) ebenfalls bestimmt werden.
Als Wolframdetektor ist die MagneticScreenScale für Goldobjekte von circa 1/4 Unze bis 250 g eine Alternative zum GoldScreenSensor. Wer ganz auf Gold setzt und z.B. 100-Gramm-Barren nicht auspacken möchte, ist mit dieser Magnetwaage gut beraten.
- Achten Sie auf einen möglichst ruhigen und erschütterungsfesten Standort der Waage.
- Die DensityScreenScale hat sich in den meisten normalen und betrieblichen Umgebungen bewährt, wobei eine Raumtemperatur von 20-25 °C ideal ist. Entscheidend ist vor allem, dass die Temperatur während der Betriebs- bzw. Benutzungszeit konstant bleibt.
- Benutzen Sie für das Wasserbad idealerweise Wasser mit einer Temperatur von ca. 20-25 °C. Füllen Sie weder sehr kaltes noch sehr warmes Wasser ein, da dies die Genauigkeit der Dichtemessung beeinflusst.
- Das Prüfstück muss trocken und sauber sein und sollte keine in Wasser lösliche Schicht besitzen. Auch Fett- und Ölschichten müssen vor der Bestimmung entfernt werden.
- Bei schwach benetzenden Flüssigkeiten (z.B. normalem Wasser) kann es vorkommen, dass sich Luftblasen am Träger bzw. am Messobjekt anlagern. Eine Luftblase mit einem Durchmesser von 2 mm verursacht hierbei schon eine Messungenauigkeit von 4 mg.
Die DensityScreenScale gibt das Gewicht des Prüflings im Wasser an. Dieses Gewicht können Sie mit dem Gewicht an der Luft in das auf dem USB-Stick mitgelieferte Excel-Berechnungstool eingeben und dann bekommen Sie automatisch die Dichte Ihres Objektes ausgerechnet.
Grundsätzlich lässt sich die Dichte berechnen, indem man die Masse eines Objektes durch sein Volumen teilt. Wenn Sie die DensityScreenScale oder das Barrenprüfset GAX1000 besitzen, dann können sie unser Berechnungstool nutzen. Dafür messen Sie das Gewicht an der Luft und das Gewicht im Wasser mit der DensityScreenScale. Diese beiden Werte können sie in das Tool eintragen und dieses gibt Ihnen dann die Dichte aus. Zusätzlich haben Sie mit dem Berechnungstool Vergleichswerte von einigen Legierungen und vielen Reinmetallen. Wenn man die Dichte selbst berechnen möchte lautet die Formel:
Dichte [g/cm³] = Gewicht an der Luft [g] / (Gewicht an der Luft [g] - Gewicht im Wasser [g])
Ja. Gold hat z.B. eine Dichte von 19,32 g/cm³ und lässt sich daher gut mit Wolfram fälschen, was eine Dichte von 19,30 g/cm³ hat. Für Silber, das ein Dichte von 10,49 g/cm³ hat, werden daher oftmals Blei-Zinn oder Molybdän Legierungen mit ähnlicher/gleicher Dichte verwendet. Deshalb ist es immer von Nöten, mindestens eine weitere Prüfmethode zu nutzen, um sicher zu sein. Messen Sie entweder noch den Leitwert des Objektes mit unserem GoldScreenSensor oder die magnetischen Eigenschaften mit unserer MagneticScreenScale. Eine Prüfmethode allein kann kein sicheres Ergebnis geben. Zur Übersicht nutzen Sie unsere Kurzfassung zum Testen von Gold.
Das hängt ganz davon ab, welche Objekte man überprüfen möchte:
Für klassische Anleger (Münzen und Barren) ist die GoldScreenSensor in Kombination mit Messschieber und Feinwaage meist ausreichend (misst auch durch Verpackungen). Für Barren ab 50 bis 100 Gramm aufwärts empfehlen wir ergänzend den BarScreenSensor, für den die Objekte jedoch ausgepackt werden müssen. Der GoldScreenPen kann außerdem auch für kleinere Anlageobjekte bis ca. 1 Unze eingesetzt werden.
Bei Goldschmuck ist die Messung mit einer Kombination aus CaratScreenPen sowie DensityScreenScale ideal. Mit unseren Prüfsäuresets kann der Feingehalt von Gold (Karatzahl) ebenfalls bestimmt werden.
Als Wolframdetektor ist die MagneticScreenScale für Goldobjekte von circa 1/4 Unze bis 250 g eine Alternative zum GoldScreenSensor. Wer ganz auf Gold setzt und z.B. 100-Gramm-Barren nicht auspacken möchte, ist mit dieser Magnetwaage gut beraten.
- Achten Sie darauf, vorsichtig mit dem Magneten umzugehen, ansonsten kann es zu Verletzungen kommen oder elektronische Geräte könnten beschädigt werden
- Eine elektrostatische Aufladung kann das Messergebnis verfälschen, achten sie daher darauf, bei den Verpackungen oder dem Plexiglasaufbau darauf, diese mit dem Antistatik-Spray zu entladen
- Testen Sie die Objekte zuvor mit dem mitgelieferten Stabmagneten auf Ferromagnetismus, da ansonsten die Waage beschädigt werden kann
Erhalten Sie von der MagneticScreenScale ein positives Ergebnis, dann ist das vorliegende Material diamagnetisch. Ist das Ergebnis schwach negativ, dann ist es paramagnetisch und bei einem starken negativem Wert ist das Objekt wahrscheinlich ferromagnetisch. In vielen Fällen bedeutet ein negatives Ergebnis, dass es sich um eine Fälschung handelt. Jedoch gibt es einige Ausnahmen, die zu berücksichtigen sind, wie z.B. ältere Krügerränder.
Nein, mit der MagneticScreenScale lassen sich keine Aussagen über Edelmetalllegierungen treffen, da die Unterschiede viel zu gering ausfallen. Es ist lediglich möglich festzustellen, ob die Prüflinge aus einem gefälschten Material bestehen. Wenn Sie die Karatzahl Ihrer Schmuckstücke wissen möchten, greifen Sie daher lieber zu unserem CaratScreenPen.
Für Schmuck existieren viele verschiedene Legierungen mit den unterschiedlichsten Metallen. Da die MagneticScreenScale sehr fein misst, kann auch nur ein kleiner Anteil eines ferro- oder paramagnetischen Metalles (z.B. Nickel, Platin) das Ergebnis beeinflussen, wodurch dieses nicht mehr aussagekräftig ist. Daher ist die MagneticScreenScale für die Schmuckprüfung eher nicht geeignet. Die richtige Wahl wäre in diesem Fall unser CaratScreenPen.
Bei dem Magneten der MagneticScreenScale handelt es sich um einen starken Neodymmagneten, mit welchem man vorsichtig umgehen muss. Zum einen sollte man elektronische Geräte und Objekte mit Magnetspeicherung (Festplatten, Kreditkarten) vom Magneten fernhalten, da diese sonst beschädigt werden können. Zum anderen sollte man diesen von anderen starken Magneten fernhalten, um Quetschungen, Absplitterungen oder Funkenflug zu vermeiden. Auch sollten Personen mit Herzschrittmachern genügend Abstand von diesem Magneten halten.
Hinweisblatt "Sicherer Umgang mit Magneten"